I make thrift store pieces all of the time. You can actually see all of the pieces that I have made here. They all work the same way. I have yet to document the progress of any of these pieces. So here I go. Below are the steps that I follow each time I find a new thrift store painting to add to.
First you will need to get your supplies. Aside from the given that you will need paint and brushes, I generally use tracing paper, pencil and eraser, carbon paper, and then whatever tools necessary to carefully remove the picture from the frame. When it comes to removing the frame I can usually get away with prying all of the staples in the back of the frame up with a butter knife. What you use to do this is up to you.

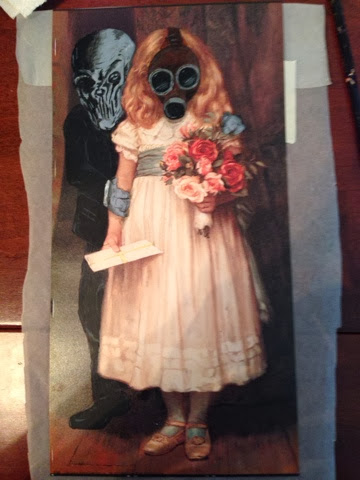
Here is the original. Cute isn't she? this is the space you have to work with. I usually visualize the finished piece with the frame still on the painting. I don't want to pull it out of the frame start my work and then when it comes to putting it back in the frame realize that I have cut something off or that it feel crammed into the space
While the frame is still on, put a piece of tracing paper over the picture and draw in the outline of what you are planning on painting into the picture. I leave the frame on just to better see how the picture will fit into the framed space. Here is where you will be able to determine if the composition fits well into the space.

After I am content with the outline of my monster I have put on the tracing paper, I then remove the picture from the frame. There are sometimes surprises when you open the frame. Extra borders you didn't know where there, the matting is glued down. Opening the frame can be an adventure. This one was rather uneventful. Once you have the picture free, lay the carbon paper over the picture ink side down and the tracing paper over that, to transfer the sketch onto the picture.

After transfer remove the tracing paper and carbon paper and make sure that all of your lines are visible and where they should be.

I then, like to block in the color. You don't want the original painting to show through. This may take a couple of coats of paint depending on the opacity of your paint.

After you have completely covered all of the original details with paint blocking. You can then feel free to start filling in details.
Then be sure you do you finishing touches. Fill in shadows around your additions so that your work blends in with the original. It is my personal preference to make the added monsters subtle. I don't want them to stand out like a sore thumb. By adding drop shadows and blending into the back ground the additions don't seems as startling. It will not be perfect. You don't poses the same painting style as the person who made the original but it is nice to get it close.
Once you have completed your work give it time to dry. My acrylics have a tendency to stick to the glass if I put it back in the frame as soon as I am done. Then if you need to ever remove the picture again later for scanning or photographing the paint will stick to the glass and ruin all of your hard work.
After giving time to dry you can then put it back in the frame and enjoy your new piece of art.
No comments:
Post a Comment